

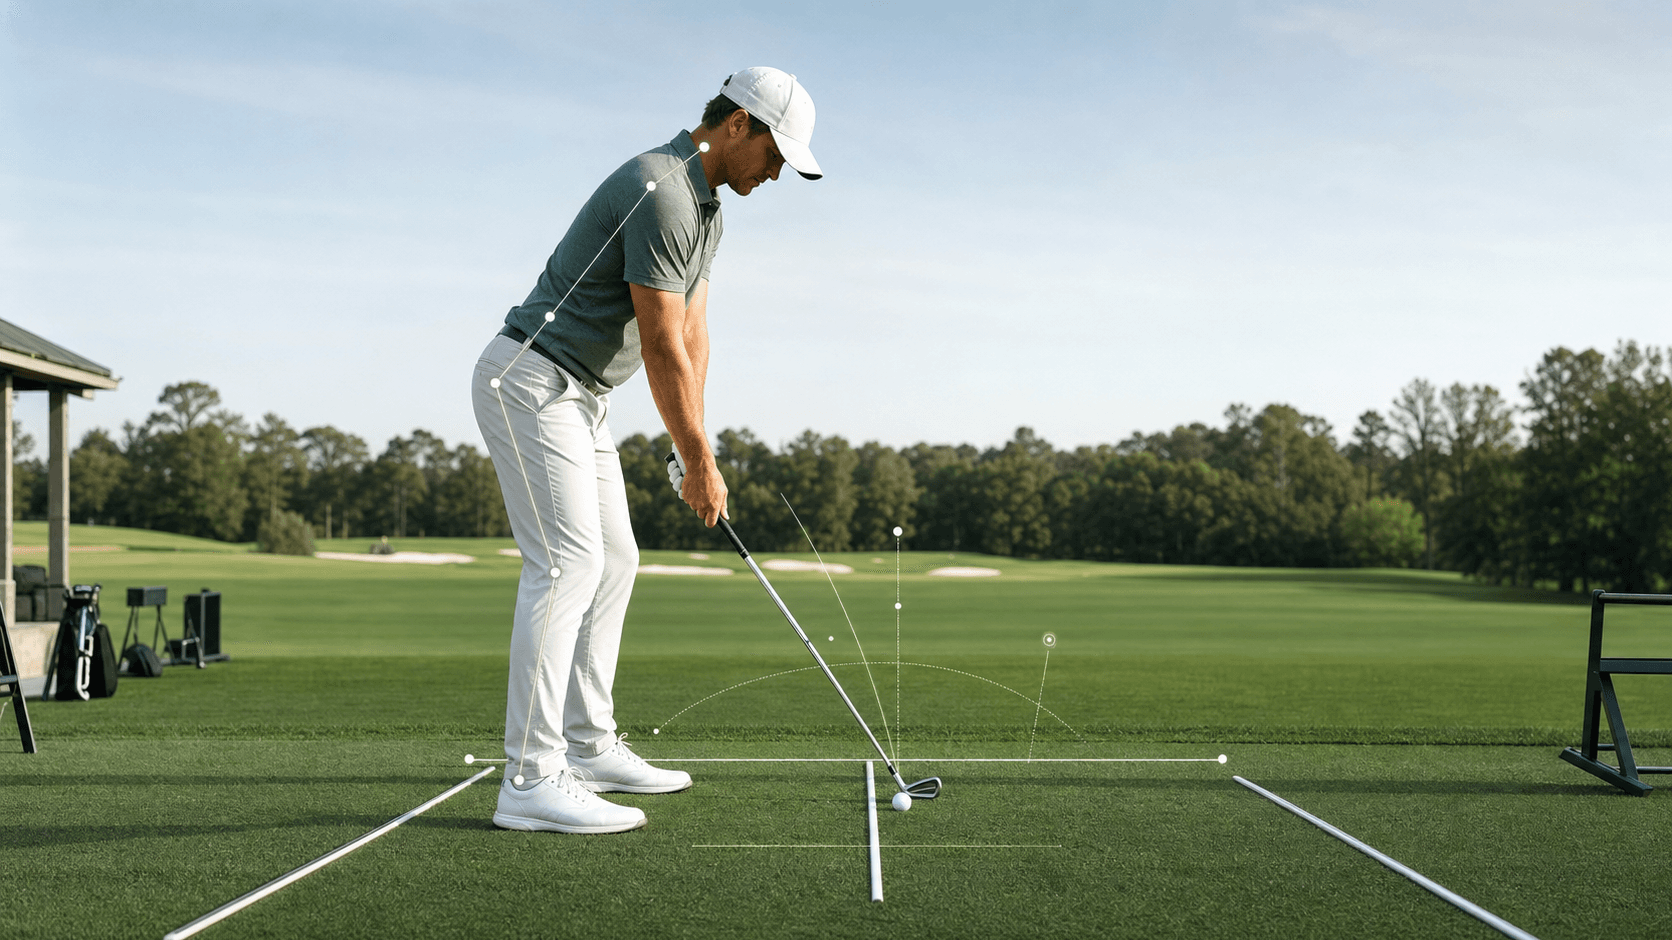
Welcome to the world of golf. My name is Chubbs, and I'm here to help you build a solid foundation for your game. As a beginner golfer, especially for women, understanding and consistently executing a proper setup is not just important – it's fundamental. Think of your setup as the bedrock of your swing. If the foundation is solid, everything built upon it has a much better chance of standing strong.
Many new golfers, regardless of gender, tend to rush through the setup phase, eager to hit the ball. However, for women, there can be unique considerations, such as finding clubs that fit well, understanding how posture feels natural yet athletic, and establishing a comfortable grip. This guide is designed to walk you through each element of a proper golf setup, providing clear, actionable steps to ensure you're starting every swing from the best possible position. A consistent, correct setup is your first step towards consistent, controlled golf shots. Let's get started.
Quick Answer
For beginner women golfers, a solid setup involves establishing a neutral grip (hands working together), a balanced stance (shoulder-width for irons, slightly wider for driver, weight centered), an athletic posture (slight knee flex, hinge from hips, arms hanging naturally), and square alignment (body parallel to target line, clubface aimed at target). Ball position varies by club: middle for irons, inside lead heel for driver. Practice these elements consistently to build a repeatable and effective starting point for every shot.
The Foundation: Why Setup Matters
Before we dive into the specifics, let's briefly consider *why* your setup is so critical. Your setup dictates the starting conditions for your swing. It influences your balance, your ability to rotate, the path your club takes, and ultimately, the direction and quality of your ball strike. A good setup sets you up for success; a poor one means you're fighting an uphill battle before you even begin your backswing. For beginners, establishing these habits early prevents the need to unlearn ingrained errors later on.
Key Setup Elements for Beginner Women Golfers
Let's break down each component of your setup, offering clear guidance to help you build a repeatable and effective starting position.
1. The Grip: Your Connection to the Club
Your grip is the only point of contact between you and the golf club. It's paramount for control, feel, and transferring power. For beginner women, finding a comfortable yet effective grip can sometimes involve considering grip size, as standard men's grips might feel too large.
Establishing a Neutral Grip: There are three common grip types:
- Interlocking: Pinky of the trail hand interlocks with the index finger of the lead hand.
- Overlapping (Vardon): Pinky of the trail hand rests on top of the index finger of the lead hand.
- Ten-Finger (Baseball): All ten fingers are on the club, touching but not overlapping or interlocking. This is often recommended for beginners, especially those with smaller hands or less hand strength, as it can feel more secure.
Regardless of the type, the goal is a "neutral" grip where your hands work together, not against each other.
- Lead Hand (left hand for right-handed golfers): Place the club diagonally across the fingers, from the base of the pinky to the middle of the index finger. Close your hand, and you should see two to three knuckles. The 'V' formed by your thumb and forefinger should point towards your trail shoulder.
- Trail Hand (right hand for right-handed golfers): Place your trail hand so the lead thumb fits comfortably in the palm of your trail hand. The 'V' formed by your thumb and forefinger should also point towards your trail shoulder.
Grip Pressure: Imagine holding a tube of toothpaste. You want to hold it firmly enough so it doesn't slip, but not so tightly that toothpaste squirts out. A good analogy is a 5 out of 10 on a scale of 1 to 10. Too tight, and you restrict wrist hinge and arm movement; too loose, and you lose control.
Issue: Hands feel disconnected or weak. Reason: Often due to a grip that's too much in the palm or too much in the fingers of one hand, leading to an imbalance. Fix: Re-evaluate the placement of the club in your fingers (lead hand) and ensure the trail hand covers the lead thumb correctly. Experiment with the interlocking, overlapping, or ten-finger grip to find what feels most secure and connected for your hand size and strength. Drill: "The Hang and Hold Drill." Hold the club out in front of you with your lead hand only, letting it hang naturally. Notice the pressure points. Then add your trail hand, maintaining that same feeling of connection. Practice this a few times before each session.
*Consideration for Women:* If standard grips feel too thick, explore "undersize" or "women's" grips. A grip that fits your hand properly allows for better control and less tension.
2. Stance and Foot Position: Your Base
Your stance provides the base of support for your swing. It needs to be stable, balanced, and appropriate for the club you're using.
Stance Width:
- Irons: Feet should be approximately shoulder-width apart (outside of shoulders aligning with the inside of your heels). This provides a stable base for rotation.
- Driver: Slightly wider than shoulder-width. The wider stance offers more stability for the longer club and more powerful swing.
- Wedges/Short Irons: Can be slightly narrower than shoulder-width for more feel and control on shorter shots.
Foot Position:
- Feet should generally be parallel to your target line (more on alignment shortly).
- You can flare your lead foot (left foot for right-handed golfers) out slightly towards the target (10-20 degrees). This can help with hip rotation through impact.
- Your trail foot (right foot for right-handed golfers) can be square or slightly flared out, whichever feels more comfortable and stable.
Weight Distribution:
- For most shots (irons, driver), your weight should feel evenly distributed, 50/50 between your lead and trail foot.
- You should feel balanced, not leaning too much on your heels or toes. A good test is to be able to lift your toes slightly, then your heels slightly, without losing balance.
Issue: Feeling wobbly or off-balance during the swing. Reason: Stance is too narrow or too wide, or weight is improperly distributed (e.g., too much on toes or heels). Fix: Adjust your stance width to match the club. For balance, ensure you feel grounded through the middle of your feet. Practice shifting your weight slightly forward and back, then side to side, to find your center. Drill: "The Balance Board Drill (Imaginary)." Stand in your setup with a club. Imagine you're on a very slight balance board. Can you hold your position without rocking? Focus on feeling pressure evenly distributed across the soles of your feet.
3. Posture and Bend: Your Athletic Ready Position
Your posture is how you stand over the ball. It's crucial for allowing your body to rotate freely and for your arms to swing naturally. The goal is an "athletic ready position."
Steps to Good Posture:
- Stand Tall: Start by standing upright, feet shoulder-width apart.
- Slight Knee Flex: Soften your knees slightly. Avoid locking them or bending them too much into a squat.
- Hinge from Hips: Push your hips back as if you're going to sit on a tall stool. Your upper body will naturally tilt forward. Keep your back relatively straight, avoiding a rounded or hunched posture.
- Arms Hang Naturally: Let your arms hang straight down from your shoulders. The club should be resting on the ground in front of you. This dictates your distance from the ball.
- Spine Angle: Maintain a consistent spine angle throughout the swing. Your chin should be slightly up, allowing your shoulders to turn freely under your chin.
Practical Checkpoint: The Club-on-Chest Posture Check Stand in your athletic posture without a club. Place a golf club across your chest, just below your collarbones, with your arms crossed over it. Now, try to rotate your shoulders. If your chin is tucked into your chest, it will impede your rotation. If your chin is slightly up and away from your chest, you'll find it easier to turn. This helps you establish a good spine angle and head position.
Issue: Feeling stiff, hunched, or too upright. Reason: Not hinging enough from the hips (leading to a rounded back) or bending too much at the knees (leading to a squat). Fix: Focus on the hip hinge. Imagine a string pulling your hips back. Let your knees soften *after* you've hinged from the hips. Your arms should hang freely. Drill: "The Wall Hinge Drill." Stand with your back to a wall, heels about 6-8 inches away. Place a club or broomstick across your shoulders. Now, hinge from your hips, trying to touch your glutes to the wall while keeping your back straight. This teaches the correct hip hinge without rounding your back.
4. Alignment: Aiming for Success
Alignment is simply where you're aiming. It's often overlooked by beginners but is critical for consistent shot direction. You need to align your clubface to the target and your body parallel to that target line.
Steps to Proper Alignment:
- Pick an Intermediate Target: Stand behind your ball, looking at your ultimate target (e.g., the flagstick). Find a spot on the ground a few feet in front of your ball that is directly on your target line (a divot, a discolored blade of grass, etc.).
- Align the Clubface First: Walk up to the ball and place your clubface square to your intermediate target. This is the most important step.
- Align Your Body Parallel: Once the clubface is aimed, set your feet, hips, and shoulders so they are parallel to your target line, like railroad tracks. Your body line should be slightly left of the target for a right-handed golfer.
- Confirm: Take one last look at your ultimate target, then back to the ball.
Named Drill/Test: Railroad Tracks Alignment Drill Place two alignment sticks (or clubs) on the ground. One stick points directly at your target, representing your clubface line. The second stick is placed parallel to the first, a few inches inside your lead foot, representing your foot line. Practice setting up with your clubface aimed at the first stick and your feet parallel to the second. This visual aid is incredibly powerful for understanding correct alignment.
Issue: Consistently hitting shots left or right of your intended target, even with a good swing. Reason: Likely an alignment issue. Most common is "aiming right" (for right-handed golfers) because the body naturally wants to compensate by swinging left, or "aiming left" because the golfer perceives they are aiming straight. Fix: Use the intermediate target method and the Railroad Tracks Drill consistently. Make alignment a conscious part of your pre-shot routine. Drill: Practice with alignment sticks. Set them up, take your stance, and then step back to check your alignment. Repeat until it feels natural.
5. Ball Position: Where the Club Meets the Ball
The position of the ball relative to your feet varies depending on the club you're using. This is crucial for optimizing the club's loft and contact.
- Driver: The ball should be positioned off the inside of your lead heel. This allows you to hit the ball on the upswing, maximizing distance with the driver's low loft.
- Fairway Woods: Slightly inside the lead heel, but a bit closer to the center than the driver.
- Long Irons (4, 5, 6): About one ball width inside the lead heel.
- Mid Irons (7, 8, 9): In the middle of your stance, or just slightly forward of center.
- Short Irons/Wedges: Exactly in the middle of your stance.
Issue: Topping or chunking the ball frequently, especially with irons. Reason: Incorrect ball position for the club being used. Hitting down on the ball with a driver or trying to scoop an iron can be a result. Fix: Be deliberate about checking your ball position for each club. Use a visual reference (like a tee) if needed. Drill: "The Foot-to-Ball Position Drill." Place a club on the ground perpendicular to your target line, aligning it with the inside of your lead heel. Practice placing the ball for a driver, then move the club to the center of your stance for an iron, and so on. This helps ingrain the correct positions.
6. Distance from the Ball: Arm's Length
Finding the right distance from the ball allows your arms to swing freely without feeling cramped or overstretched.
How to Find Your Distance:
- Set up with your grip, stance, and posture established.
- Let your arms hang naturally from your shoulders.
- The butt end of the club should be roughly a hand's width from your body.
- The clubhead should rest flat on the ground.
Issue: Feeling cramped or reaching for the ball, leading to off-center strikes. Reason: Standing too close or too far from the ball, often a symptom of incorrect posture (too upright or too bent over). Fix: Focus on your posture first (hip hinge, arms hanging). The distance from the ball should then naturally fall into place. Drill: "The Arm Hang Test." Get into your setup posture without a club. Let your arms hang completely relaxed. Notice where your hands are relative to your body. Now, pick up the club and try to maintain that same arm hang, letting the clubhead dictate your distance from the ball.
7. Pre-Shot Routine (Briefly)
A consistent pre-shot routine helps you execute all these setup elements consistently. It's a sequence of actions you perform before every shot. For beginners, it doesn't need to be complex, just consistent.
- Walk behind the ball, pick your target.
- Pick your intermediate target.
- Address the ball, aligning the clubface.
- Set your feet and body.
- Take one last look at the target.
- Execute your swing.
Integrating Technology for Your Setup
If you are unsure about one visible setup pattern, use /coach to describe the miss and goal, or /upload one clear clip for a video-informed Chubbs AI review. The AI cannot measure grip pressure or target alignment and does not replace an in-person professional.
Quick Checklist: Your Setup Reference
Use this checklist before each practice session or round to ensure you're starting strong:
- Grip:
- Neutral hands, V's pointing to trail shoulder.
- Pressure: 5 out of 10.
- Club in fingers of lead hand.
- Stance:
- Shoulder-width for irons, slightly wider for driver.
- Weight 50/50, balanced.
- Posture:
- Slight knee flex.
- Hinged from hips, straight back.
- Arms hanging naturally.
- Alignment:
- Clubface square to intermediate target.
- Body parallel to target line (railroad tracks).
- Ball Position:
- Driver: Inside lead heel.
- Irons: Middle to slightly forward of center.
- Distance from Ball:
- Arms hanging freely, clubhead flat on ground.
FAQ: Common Questions for Beginner Women Golfers
Q: What's the best grip for beginners? A: The Ten-Finger (Baseball) grip is often easiest for beginners to learn and provides a secure feeling. As you progress, you might explore the Overlapping or Interlocking grips for more control and feel. The "best" grip is the one that allows you to feel connected to the club and swing freely.
Q: How do I know if my club is the right length? A: Proper club length is determined by your height and wrist-to-floor measurement. While this article focuses on setup, if you consistently feel like you're hunching excessively or reaching too much despite good posture, your clubs might be too long or too short. A professional club fitting is the best way to determine ideal club length and lie angle. For beginners, starting with standard women's clubs is usually a good starting point.
Q: Should I use women-specific clubs? A: "Women-specific" clubs typically feature lighter shafts, more flexible shafts, and sometimes larger grips or more offset. These characteristics can be very beneficial for beginner women golfers, as they are designed to help generate clubhead speed and hit the ball higher and straighter. It's often a good idea to start with clubs designed for women as they are generally more forgiving and easier to swing.
Q: How often should I practice my setup? A: Every time you pick up a club, even if you're just taking practice swings in your living room. Consistency is key. Dedicate 5-10 minutes at the start of each practice session just to your setup, using the drills and checklist provided.
Q: What if my setup feels awkward or unnatural? A: That's common for beginners! Golf posture is an athletic position that might not feel like your everyday stance. Focus on small adjustments. Use a mirror or record yourself with your phone to compare your setup to the guidelines. Over time, with consistent practice, it will start to feel more natural and comfortable. Remember, the goal is an athletic, balanced position, not necessarily a relaxed one.
Conclusion
Mastering your setup is the most impactful step you can take as a beginner woman golfer. It provides the stability, balance, and alignment necessary for a consistent and effective golf swing. Take your time with each element: grip, stance, posture, alignment, ball position, and distance from the ball. Practice these components diligently, and they will become second nature.
Remember, golf is a journey of continuous learning and refinement. Don't get discouraged if it doesn't feel perfect immediately. Focus on one element at a time, use the drills provided, and consider leveraging tools like the SLGP AI at /upload for personalized feedback. A solid setup isn't just about hitting the ball better; it's about building confidence and enjoyment in your game. Keep practicing, and you'll be hitting straighter shots in no time.
